Labels

Warm Fuzzy


For my sister's birthday, I wanted to make her a corn heating bag. I had some green fleece, and as I cut it out I decided to embellish a little.

These are simple to make, just pick up some feed corn (DON'T use popcorn!) from your local farmer's store, or rice will work as well. Fill a cotton bag with the seed, leaving enough room that it can wrap partly around feet, your neck, etc. Sew the bag shut, and create a case out of fleece, flannel, or something else snugly.

To heat the seed, place the cotton bag in your microwave for a few minutes (don't overcook) and insert it in the case. It will stay warm for at least a half hour, sometimes longer, and is a nice alternative to a plug-in heating pad. A sachet of herbs, like lavender can be included in with the seed, or you can sew a pocket on the outside of the cotton case for a little aroma-therapy.

Cakes for Grace

These are some cakes I've made for my friend's little girl, Grace. My friend likes to pick out the napkins and party plates first, then has me design a cake to match. I like the creative challenge, the hardest part for me is matching colors.
I hesitate to charge for making cakes because I'd feel obligated to make it perfect, so for now I do it for the practice.

1st Birthday:
It is easy to see why I stick with fondant, my piping skills need a lot more practice. At least I spelled her name right-that's the most important part right? I used the Wilton flower cutting set to make the flowers and free-handed the butterflies. I pressed them a little so they wouldn't lie flat and let them dry.


2nd Birthday:


I found a Pooh coloring page and used it as a template to cut out the red and yellow fondant. It needed a little something more, so I etched the lines in with a small knife and painted them in with some food coloring. For the sides I rolled long snakes of each color and cut them to roughly equal lengths. I lined them up and rolled them flat. Maybe there is an easier way to do this, they weren't as straight as I'd hoped, but it worked out well enough and I loved how the colors turned out.

3rd Birthday:
This one was fairly simple, I used the flower cutouts and butterflies again. Note to self: some of the Wilton's purple gel food coloring turns BLUE if transported in a warmish car.


4th Birthday:

I love how curly Grace's hair is and had the idea of making a little princess topper when I saw the princess tiara napkins. I copied the tiara onto the front of the cake and made a mini one to go on her hair. The girl is all fondant except the hair, which is colored royal icing I piped into ringlets. I used white fondant for the skin and star, then colored it in with non-toxic chalk. It made the rosy cheeks easy.


Haha, ignore the dishcloth in the background, I just noticed it was there!

Fused Plastic Bag Bibs


My little buddy just decided that he was done with all this spoon-feeding, but his hand-feeding skills generate a lot of interesting kibble on the seat of his chair and on the floor. Maybe it's time to get a dog, but in the meantime I thought a bib with a pocket would cut down the crumb zone a little. I looked at pocket bibs a few times at the local box stores, but I have a hard time paying over $5 for something I can make myself. (Even if I know I'll never get around to it). When I saw a tutorial on how to fuse plastic bags together to make a thicker, sew-able plastic, I thought it would be fun to try this and make a few bibs.

The tutorial I followed left out a few important pointers. I've since found a better tutorial that shows this process in detail here.

I took eight plastic bags and cut the handles and the seam off the bottom. I cut one side to lay them flat and layered them with the printed sides on top of each other. I used parchment paper under the bags, and had one piece I moved around with the iron.

After a few seconds I realized the iron must be too hot, because this is what happened:


I turned the iron down from the cotton setting and tried again. When I finished it was a bit bubbly in places where it didn't fuse completely, but at least it didn't immediately begin melting holes. Each iron will be a bit different, but I'd suggest you start with the iron set in the middle and turn it up or down as you need.
My finished plastic fused together for the most part but there were bubbles where a layer or two didn't fuse. The tutorial I followed didn't mention turning the plastic over partway through, or re-ironing it until all bubbles fuse. I guess I don't mind the bubbling so much on a bib, it made it a little softer, but if you want to sew something like a tote you would need it completely fused so it won't rip.
I also learned the hard way that any printing on the bag would stick to the paper, so printing needs to be on the inside. It wasn't a huge problem but it made it a little messy.

I then used a bib I had to trace a pattern. This bib didn't have a pocket so at the bottom I flipped the bib and turned it out a little so the pocket would stay open all the time.


The fused bags cut easily, and though my little buddy will be advertising for a major box store, he'll just be making a mess all over it.


To finish the bib, I dug in my stash and found some bias tape. I didn't have any double-fold tape, which would have worked better, but I figured it would be silly if I went out and bought supplies to make this when I wouldn't pay for a finished product. (The age-old crafting trap!) I also had some sewable Velcro in my stash. I sewed the tape across the pocket first, then used one long piece to go from one bottom corner of the bib to the other. I sewed on the Velcro, and was finished. The bib was far from perfect but I had to keep reminding my perfectionist self: "Self, this is a BIB!".


Only 45 minutes had passed from start to finish, so I used the other half of the fused bags to make a second bib. Wow, I got two bibs done in one naptime AND I helped save sea turtles!

An alternate, also eco-friendly material to use would be to cut up an old plastic tablecloth, like the one you happened to set that hot pot down on one spot...

Here is a pattern for this bib. I think I might make it a little longer next time, this can be done easily by adding an inch or two where the pieces join. The images should be printed at 8 1/2 x 11 for it to be the correct scale. Remember printing from your browser will resize the image, so save it then print it.

Gifts for Baby Boy


I get a new nephew soon, and yes, the gifts are for him, but they mostly make the new mommy's life easier! I sewed a matching cover for a nursing pillow, nursing cover, burp cloths and pee-pee tee-pees.

(Tutorial for the tee-pee's here).


The pony on the nursing pillow turned out a little shaggy but I loved how soft the fabric is. When my little buddy was born I made a cover that was half denim and half fleece and I love it! The pattern for the pillow cover that came with the pillow form had a zipper opening at the top. After making two using this pattern, I decided I liked the version that has a velcro opening at the center instead, because it is MUCH easier to get the pillow back in. If I use the zipper again, I'll use a much longer zipper than the pattern calls for.


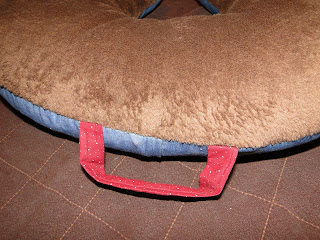
Another thing I added on was a handle at the top. One of mine is getting a little frayed at the top because I grab it there all the time to move it around.


The nursing cover is made from 1 1/2 yards of shirt-weight denim cut to 30" wide. That makes an extra big nursing cover. I like them big so you can nurse in public without worrying much about wind, or little hands lifting up the cover. It has a boning center so you can see the baby, and an adjustable neck loop. A washcloth is sewn into the corner so the extra half of the washcloth can be tucked in or pulled out in a hurry.

The burp rags are just two pieces of flannel serged together, because you can't have too many of these.

Pee-pee Tee-pees

When I first heard about these, I about fell on the floor laughing, but they really do help-if you are fast enough or get in the habit of using them each time. If you've ever diapered a baby boy, you are probably aware that you run the risk of sudden showers. You simply cover the danger zone with one of these until the clean diaper is ready, and it prevents surprises. You still need to clean up the puddle, but at least you aren't wiping down the wall (or hair and picture frame and mobile...).


They are so easy to make too:

Take one washcloth, fold it in fourths and cut a circle through all four layers. A CD is a good size for a guide.


Using the cut washcloth as a guide and cut out four circles of flannel, then cut all of the circles in half.

You can either sew and turn in the seams, or serge these like I did. First serge one layer of flannel to one layer of washcloth along the curved side.


Then fold it in half so the flannel is inside and serge along the straight edge. Clip the threads and turn it so the washcloth is on the inside-and you are done!